Everyone’s teaching how to build a course that “changes lives,” yet most learners drop off by module two. In 2026, creating an online course isn’t about TED Talk energy. It’s about designing something people finish, clear, purposeful, and human. I’ve seen polished courses flop while simple, well-structured ones succeed. The difference? One connects; the other performs. In this guide, you’ll learn how to create an online course that’s effortless to build, engaging to follow, and impossible to abandon.
Who This Guide Is For:
- HR and L&D professionals responsible for employee training and development.
- Team leaders, managers, or business owners who oversee skill-building or compliance training.
- Educators and trainers who want to deliver engaging, structured online lessons.
- Course creators and coaches looking for a faster, simpler workflow.
- Anyone new to online learning who wants to build their first course without technical hurdles.
Step 1: Selecting Your Course Topic
The secret to creating an online course people actually finish? A topic that fits you and your learners. Pick wrong, and you’ll lose both interest and engagement fast.
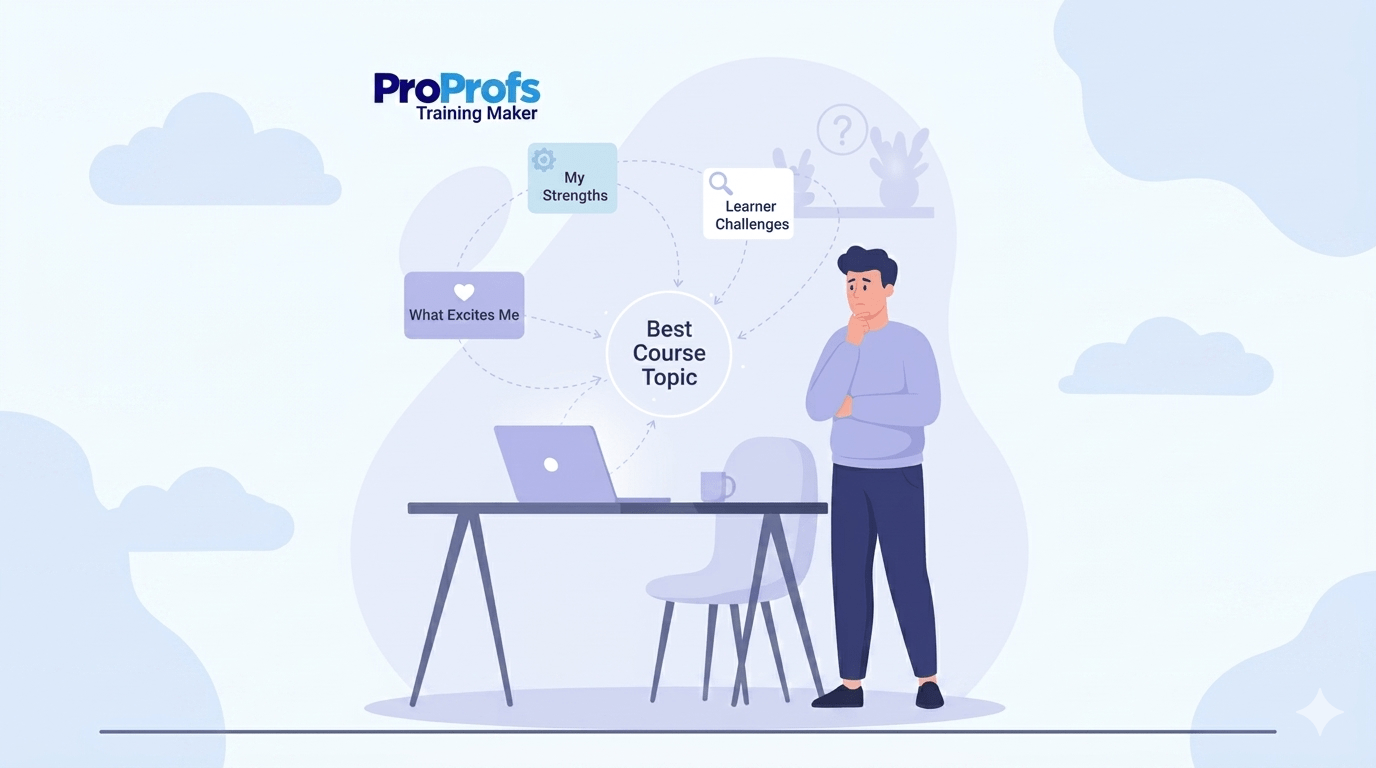
I’ve found the best ideas sit where your skills, curiosity, and audience demand overlap. Here’s how I usually nail it down:
- Start with what you know – your job, hobbies, or hard-earned skills. If you’re in HR, try “onboarding that doesn’t bore.” If you bake, go for “beginner recipes that don’t flop.”
- Pick what you love – something you’d talk about endlessly without burning out.
- Know your learners – their struggles, goals, and language. A topic like “Delegation for First-Time Managers” hits real pain points.
- Add your twist – mix niches or take a fresh angle; “AI Tools for Creative Writers” stands out more than “Creative Writing 101.”
- Test the overlap – list My Strengths, What Excites Me, Learner Challenges, and Market Gaps. Circle what repeats. That’s your winner.
And if you want to shortcut the whole brainstorm? Use AI. I love using ChatGPT to cross-check demand, dig into 2026 trends, and spot fresh angles like AI ethics, sustainability, or wellness niches Gen Z actually cares about.
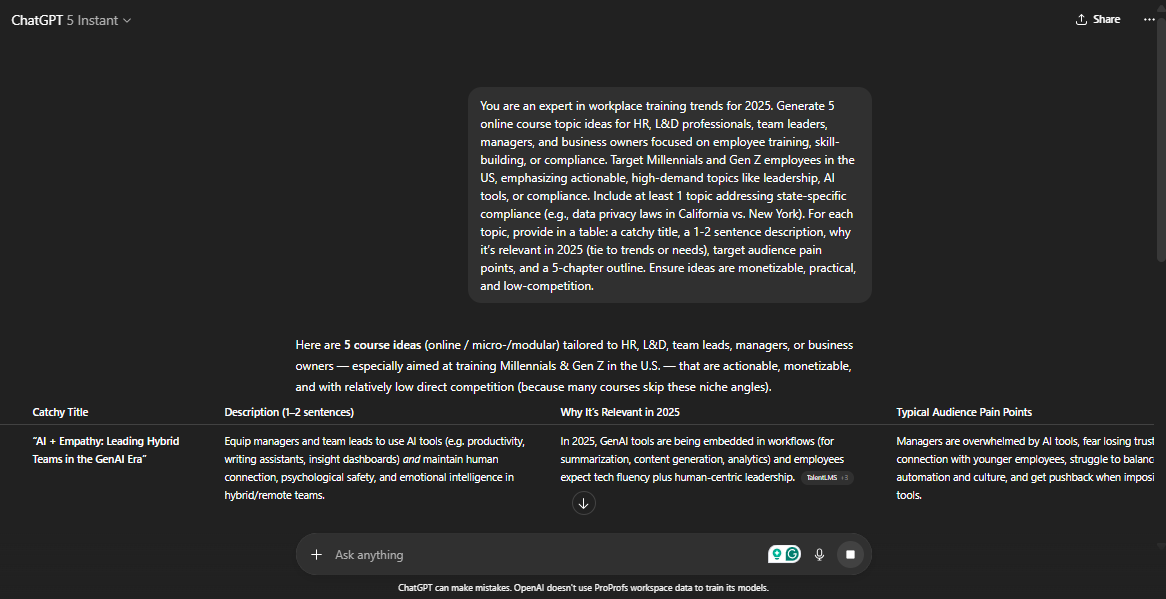
Here’s a plug-and-play prompt you can drop straight into ChatGPT to find your next course idea:
“You are an expert in workplace training trends for 2026. Generate 5 online course topic ideas for HR, L&D professionals, team leaders, managers, and business owners focused on employee training, skill-building, or compliance. Target Millennials and Gen Z employees in the US, emphasizing actionable, high-demand topics like leadership, AI tools, or compliance. Include at least 1 topic addressing state-specific compliance (e.g., data privacy laws in California vs. New York). For each topic, provide in a table: a catchy title, a 1-2 sentence description, why it’s relevant in 2026 (tie to trends or needs), target audience pain points, and a 5-chapter outline. Ensure ideas are monetizable, practical, and low-competition.”
When I ran this exercise, ChatGPT generated surprisingly relevant ideas that helped me visualize real demand. To make the prompt more specific, tweak it with your niche (for example, add “healthcare focus”).
Once you’ve chosen a topic, define a clear course goal, like “Help beginners master basic photography in 4 weeks.” This will keep your content focused and structured.
Step 2: Choosing How You Want to Build Your Course
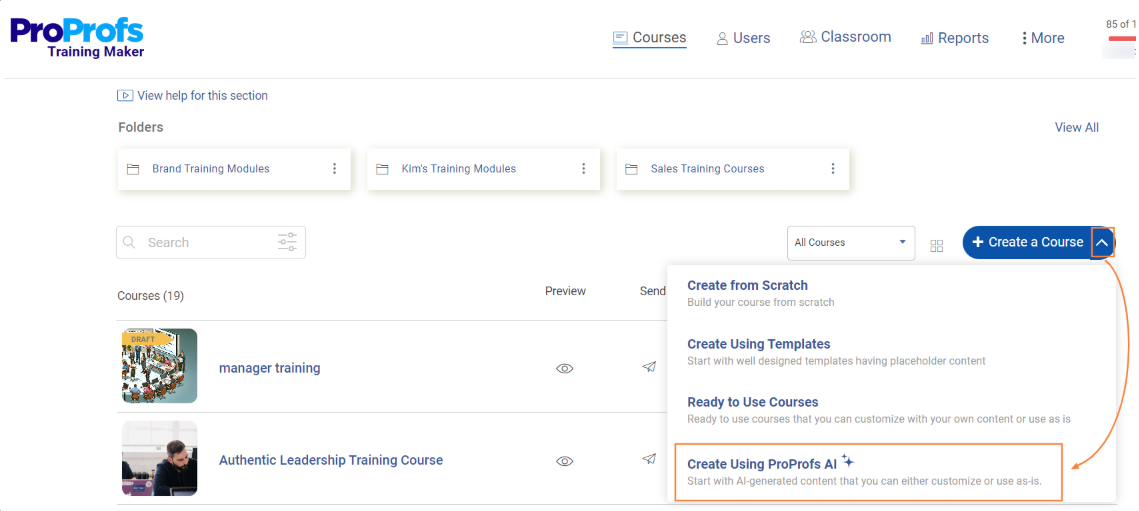
With your topic ready, it’s time to decide how to build your course in ProProfs Training Maker. You get three options: AI Course Builder, Ready-to-Use Courses, or Templates. I usually go with AI for new topics, but templates are great when I need a quick, structured base.
Option A: Creating a Course with Built-in AI
Recently, I was putting together a course from scratch on a topic that was still evolving, so I used the AI feature in ProProfs Training Maker to get some structure. It helped me sketch out an outline, lessons, and a few quiz ideas based on what I entered – and if you’d rather skip the setup and create a course in minutes, you can do it directly in ProProfs.
If you’re in a hurry, you can watch this short video:
Now, let me walk you through how to set up your course using AI.
1. From the dashboard, click the arrow next to +Create a Course and select Create a Course With AI.
2. Enter your topic (e.g., “Data Privacy Compliance for US Managers”), upload supporting files (like PDFs or notes), and specify the number of modules and quizzes. Try it yourself:

Let ProProfs AI create your training course
3. Click Generate. The ProProfs AI will organize lessons, create content, and add quizzes automatically.
In a recent project, it even built ready-to-edit chapters with built-in scenarios and assessments, saving hours of prep time.
Option B: Using Ready-to-Use Courses
Some topics, like HR or compliance, already have clear rules and standards, so it makes sense to use one of the expert-built, pre-made courses instead of starting from scratch. I usually just search for the topic, find one that fits, and use it as is.
Here’s how I use them:
1. From the dashboard, open the Courses Library or search for topics like compliance or sales.
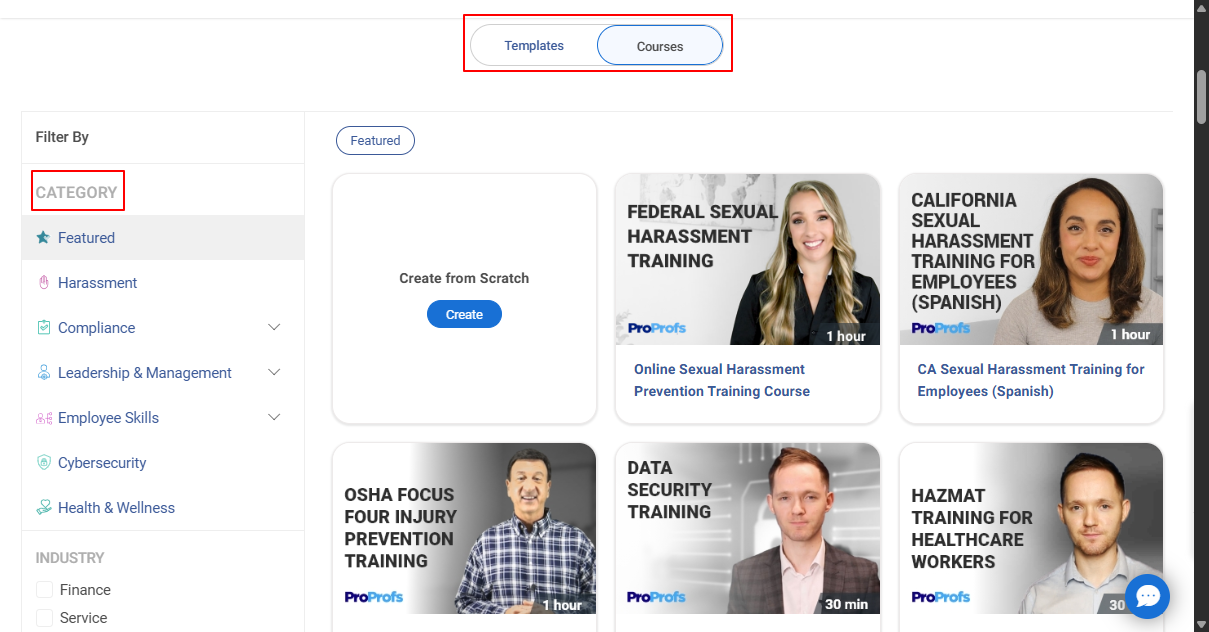
2. Browse by category, HR, safety, customer service, or soft skills, and pick a course that fits your focus.
3. Import it to your account, then edit right away. Add your logo, update text for state-specific rules, or insert your own videos and PDFs.
I once customized a safety course for a Texas client using OSHA updates; it was live in under an hour, complete with mobile access and progress tracking.
Option C: Starting with Prebuilt Templates
Templates are perfect when you know your goal, onboarding, sales training, compliance, and want a clean layout ready to fill.
Here’s my quick setup:
1. Go to the Templates section and filter by category, like onboarding, HR, technical, or customer service.
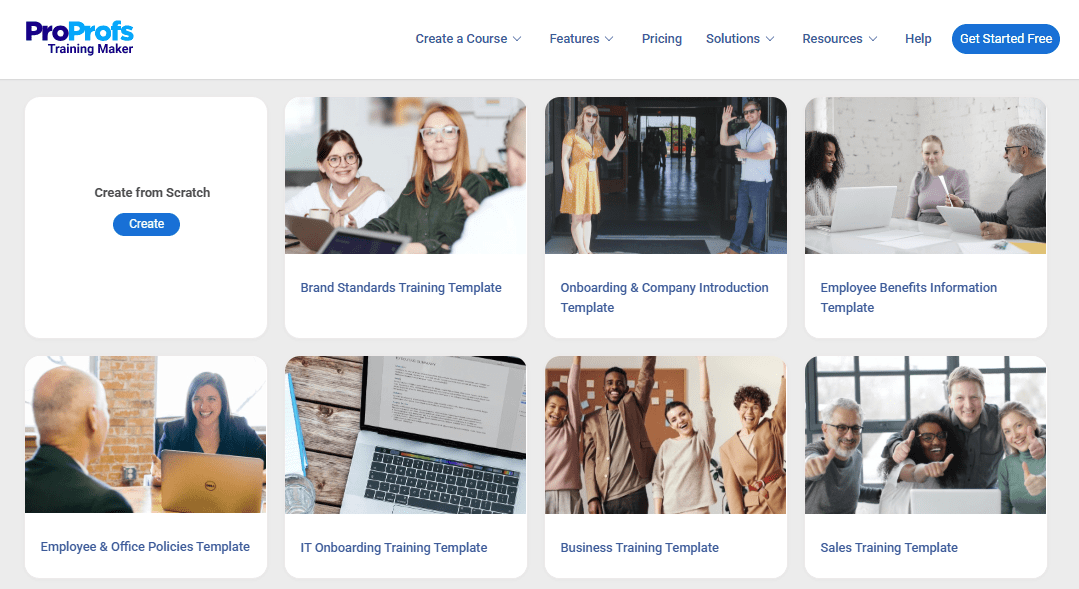
2. Click Use This Template and it loads instantly into the editor with pre-structured modules and text prompts (like “Add your company’s remote work policy here”).
3. Drop in your content — text, media, or quizzes. You can also use AI to rewrite or expand sections instantly.
For a marketing course, I used the “Marketing Training Template” and added Gen Z-focused examples like influencer campaigns and short-form video trends.
Then I included interactive polls to boost engagement and had a complete course ready in no time.
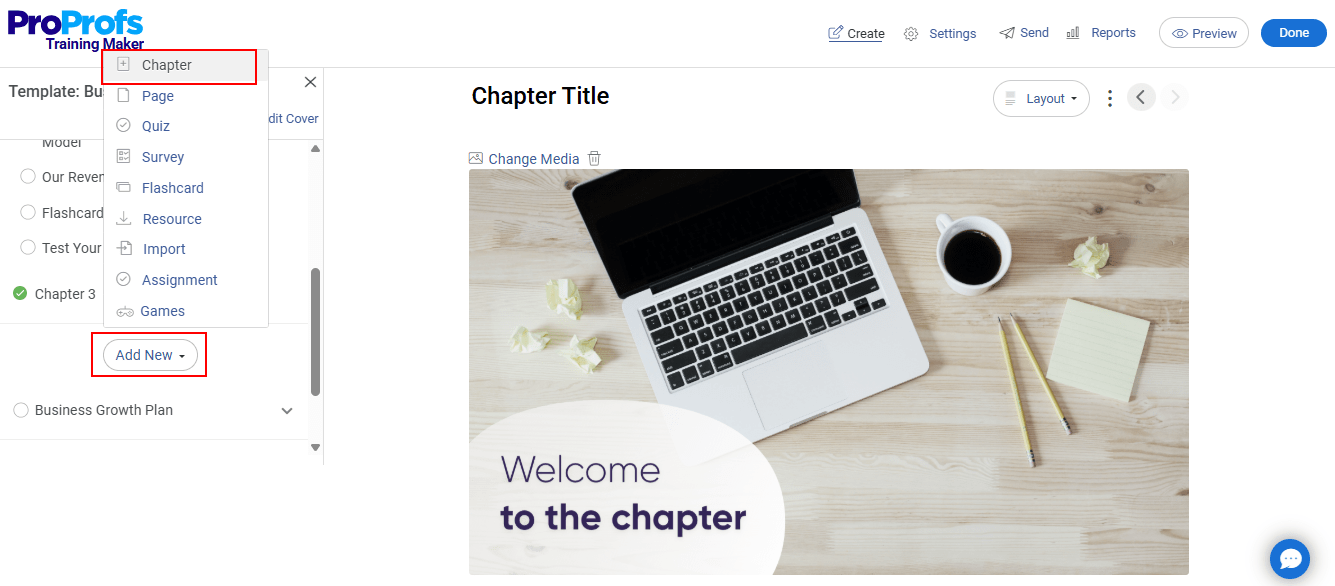
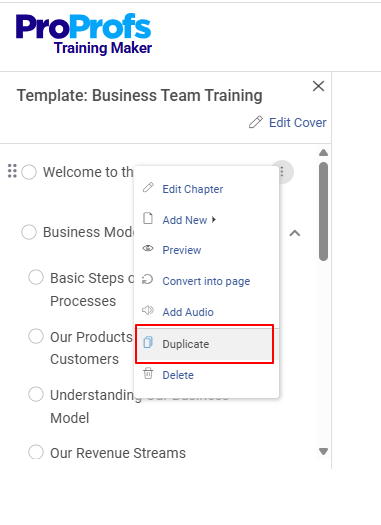
Step 3: Building or Customizing the Course Structure with Chapters
Once your base is ready, build your structure with chapters to keep content clear and organized, for example, “Basics,” “State Rules,” and “Best Practices” for a compliance course.
Here’s how I do it:
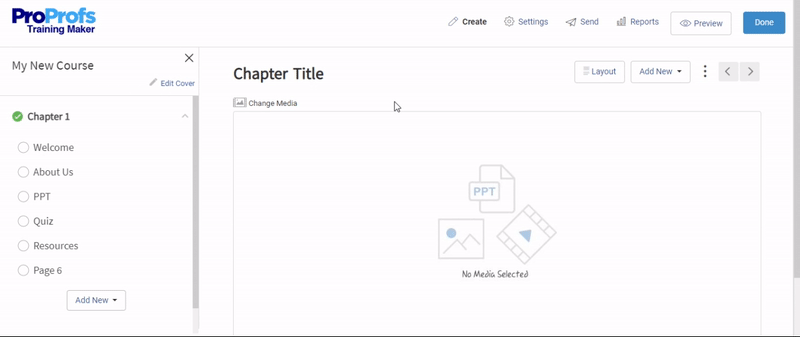
1. In the course editor, use the side panel to view your structure.
2. Click #1 Add New, choose Chapter, name it, add a short description if needed, and save.
3. To duplicate a chapter, hover over its title, click the three dots, and select Duplicate. This is handy for similar versions, such as state-specific modules.
4. Open each chapter to add pages, quizzes, or resources.
5. Reorder chapters by dragging them in the side panel.
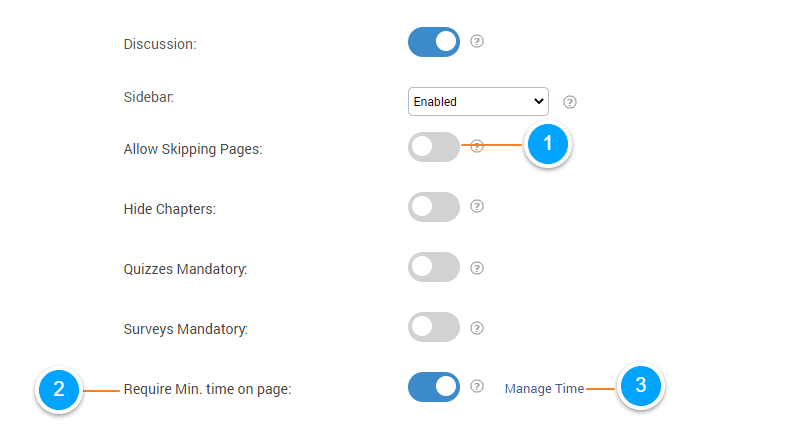
6. In your course settings under the Advanced tab, turn off Allow Skipping Pages, turn on Require Min. Time on Page, then click Manage Time to set the duration.
Step 4: Adding Content like Text, Images, Videos, and Presentations
With chapters ready, add content using text, visuals, and media to make learning clear and engaging. You can upload files up to 2GB directly to the editor.
Here’s my quick setup:
1. Add text: Go to your chapter or page, enter the title, and type your content in the WYSIWYG editor. Use the toolbar for basic formatting, pasting, and styling.
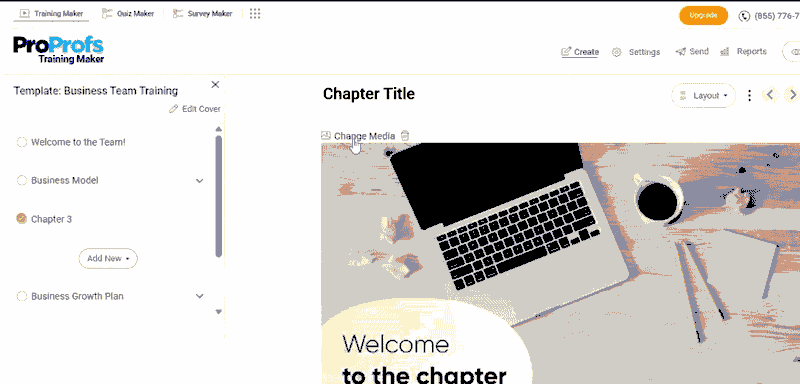
2. Add images: Click the image icon or Change Media to upload from your computer, pick from the library, or embed using a link.
3. Add audio: Click the three dots next to Add New, then upload an MP3/WAV file or record your own.
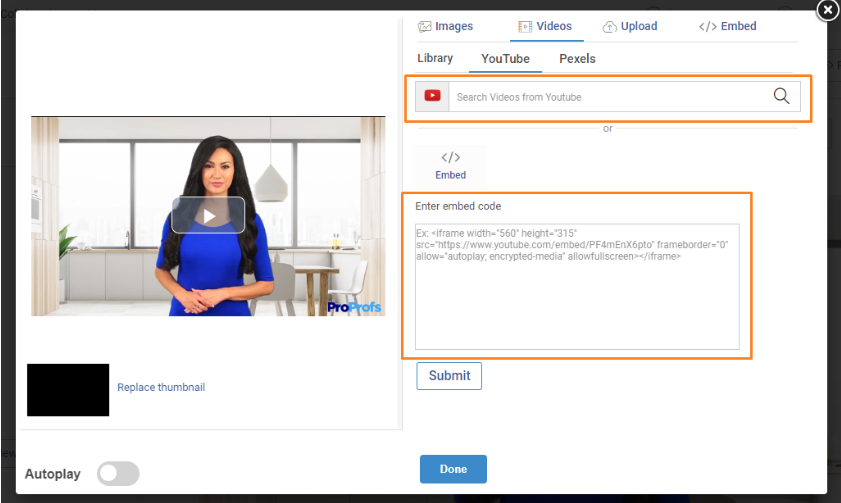
4. Add videos: Click Change Media and choose from Library, YouTube, or Upload. Supported formats include MP4, MOV, AVI, and more. You can also add captions manually or auto-generate them.
5. Add documents, spreadsheets, and presentations: Go to Change Media → Upload, then upload PDF, DOCX, XLSX, or PPT files (up to 2GB). Presentations automatically convert into slide-style pages.
For a data privacy course, I added state PDFs as handouts, embedded a YouTube explainer with quiz pop-ups, and used short text summaries for quick reviews.
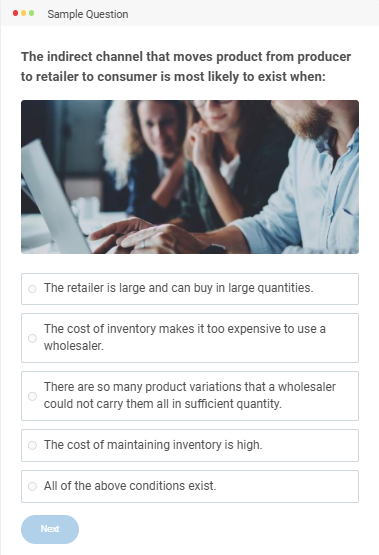
Step 5: Creating Retention Checkpoints with Quizzes and Exercises
Use quizzes for quick feedback and assignments for practice. Add them at chapter ends or as standalone modules to reinforce key points.
Here’s my quick setup:
1. Go to Add New > Quiz — name it, set a pass mark (for example, 80%), and add a timer if needed. Choose from multiple-choice, true/false, fill-in-the-blank, or essay questions (up to 20 per quiz).
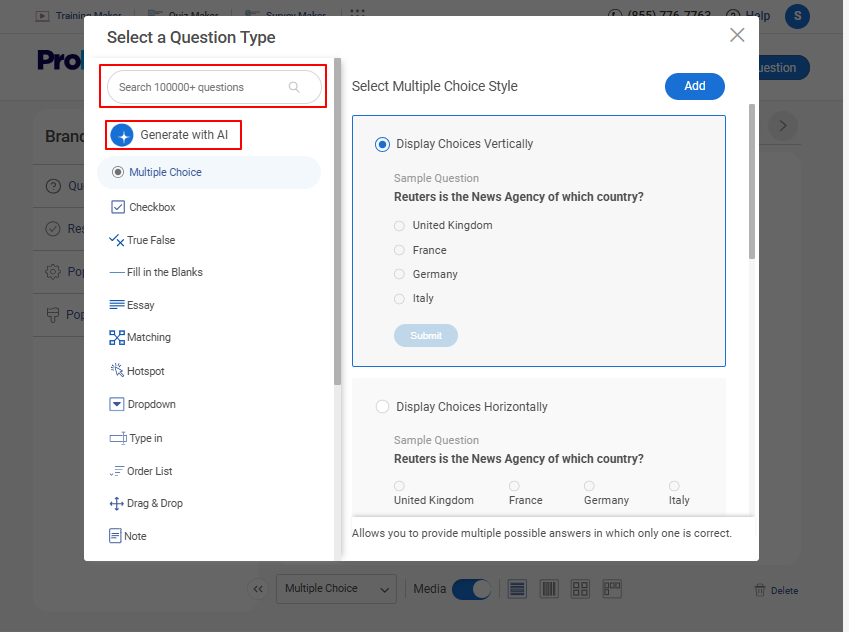
2. Build each question with clear options, correct answers, and brief explanations. Randomize order to avoid repetition.
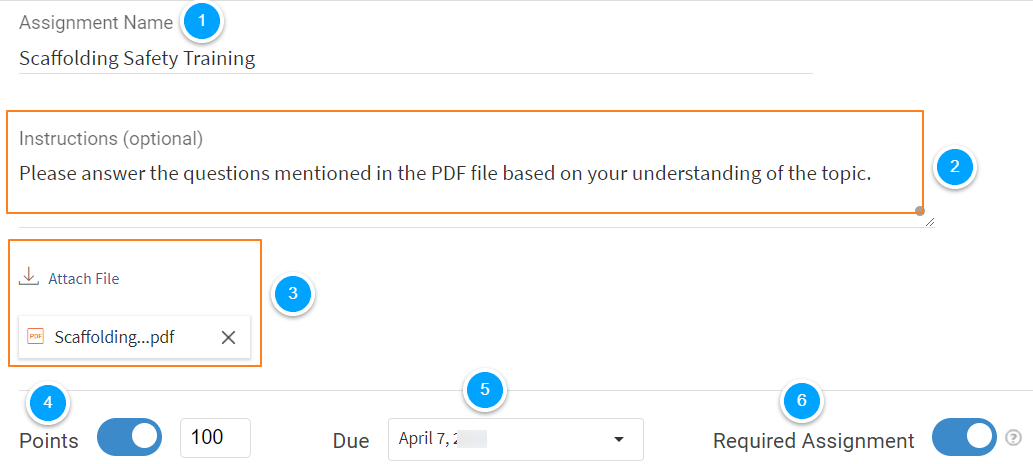
3. For practical tasks, select Assignment, write clear instructions, allow file uploads (DOC/PDF up to 20 MB), and enable manual grading with comments or rubrics.
In one compliance course, short quizzes after each state section improved pass rates and flagged tricky topics early.
Step 6: Enhancing Engagement with Gamification and Automation
Gamification adds fun through points and badges, while automation handles reminders and follow-ups to boost completion rates.
Here’s how to set it up:
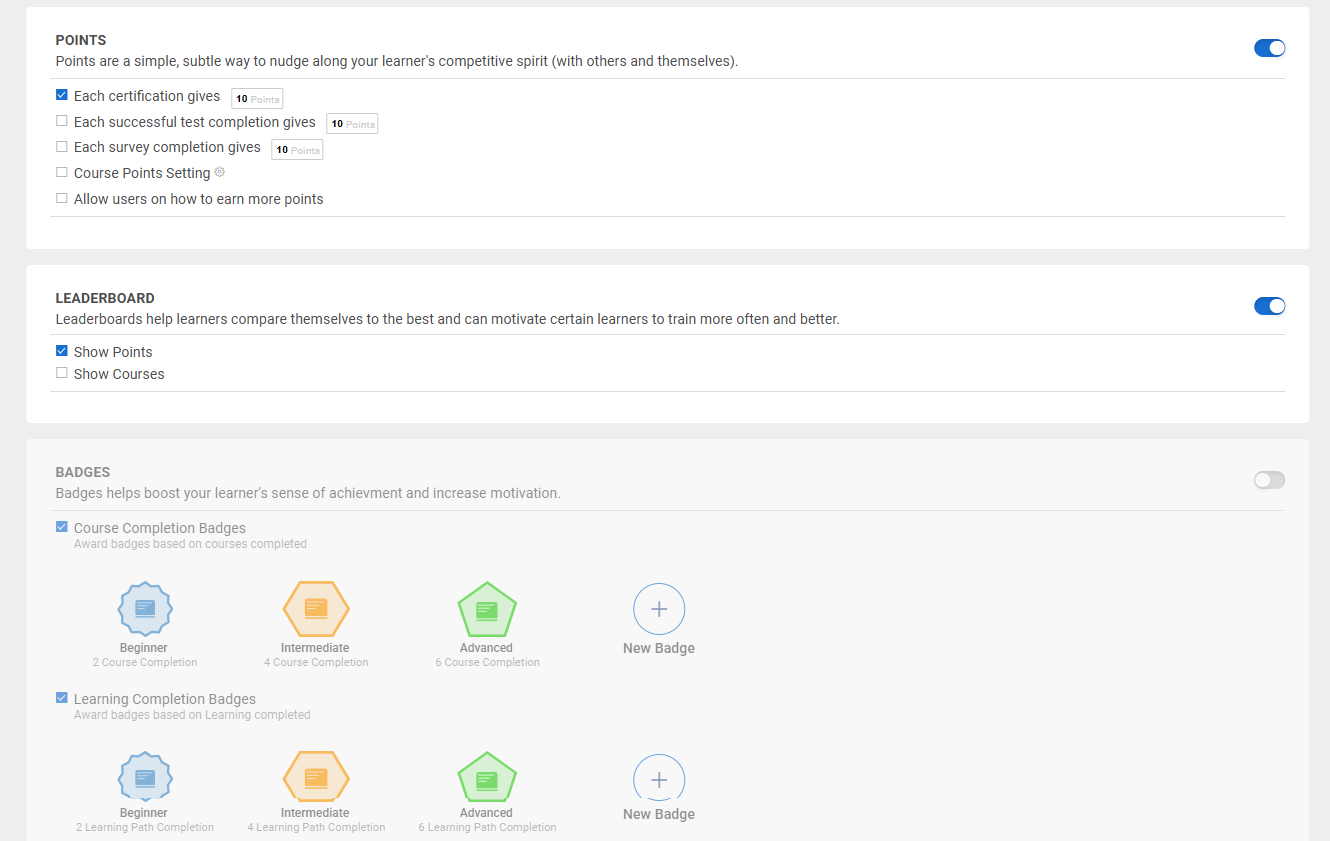
1. Gamification: Go to More > Gamification. Enable points for actions (like 10 per quiz), badges for milestones, certificates for completion, and leaderboards for healthy competition.
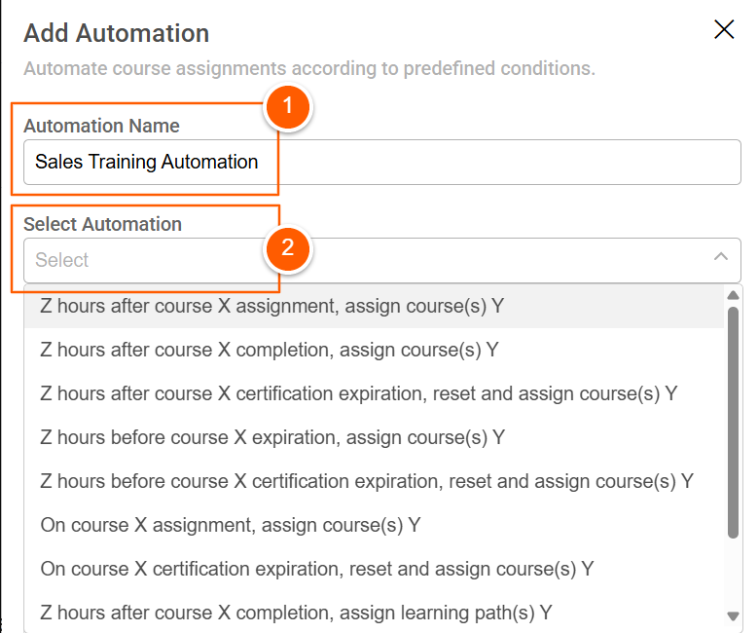
2. Automation: In Add Automation workflow, set triggers such as “Course Started” or “Quiz Failed,” then link actions like email alerts or branching to remedial content.
In a sales training program, adding badges for top scorers increased engagement by nearly 30%.
Step 7: Sharing and Distributing Your Course to Learners
Once your course is ready, it’s launch time. ProProfs makes it easy to share securely through links, emails, or QR codes, with full tracking and access control.
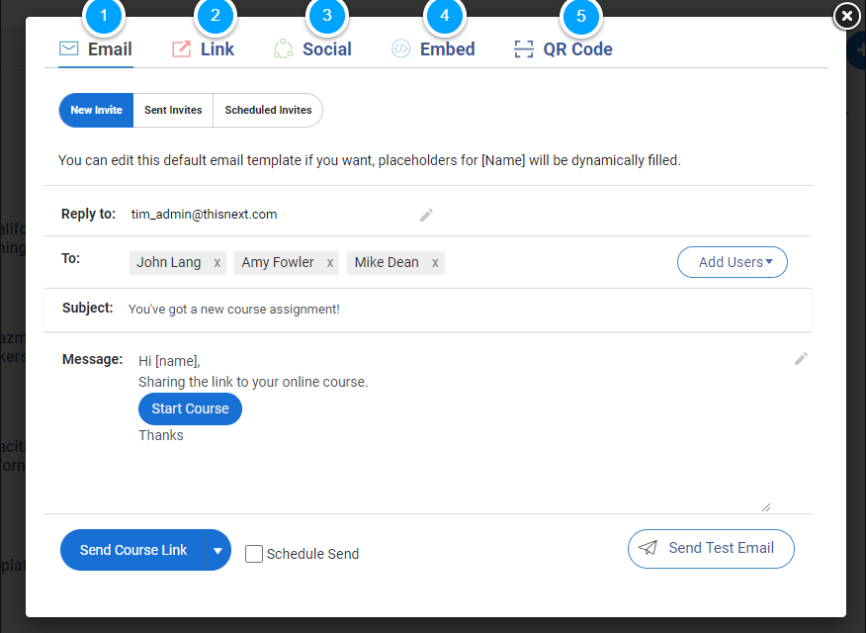
Here’s how to do it:
1. Basic Share: From the course overview, copy a link or embed code for your site or LMS. Set passwords or expiry dates for limited access.
2. Email Invites: Send personalized bulk invites with one-click enrollment buttons. You can also schedule delivery for optimal timing.
3. QR Codes: Generate QR codes for print or digital materials, scans take learners straight to enrollment.
4. Advanced Sharing: Assign courses to groups or individual users, set expiration dates, or sync with calendars for scheduled sessions.
I once added a QR code to a workshop handout and got 50 instant sign-ups right on the spot.
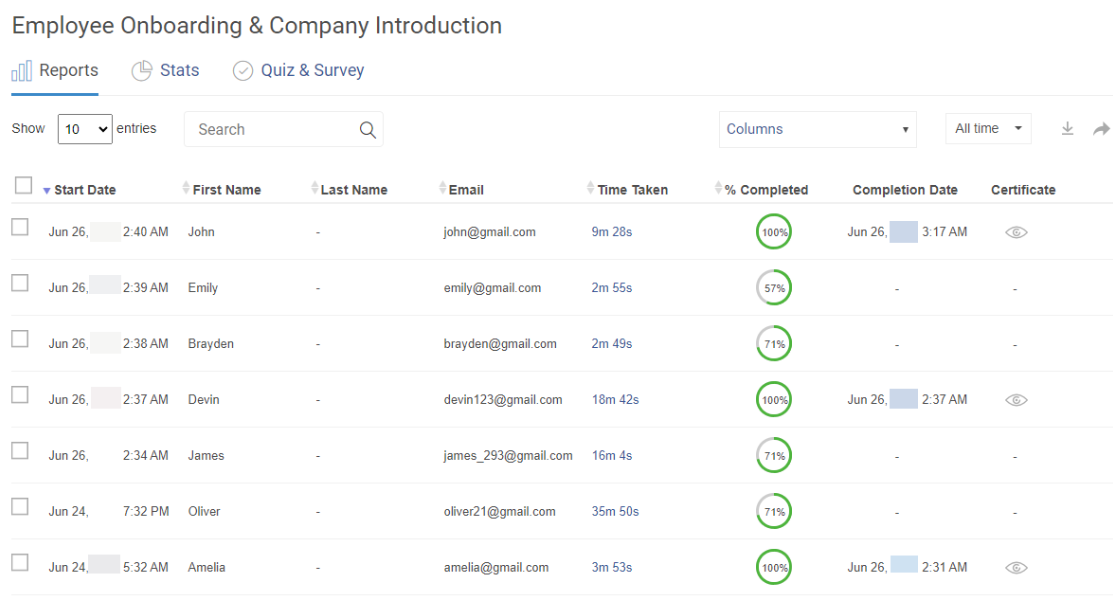
Step 8: Tracking Progress with Reports and Analytics
ProProfs gives real-time insights into completion rates, quiz scores, and time spent so you can spot trends and make improvements early.
Here’s how I do it:
1. Access Reports: Go to the Reports tab and filter by course, user, or date to view progress bars, scores, and engagement stats.
2. Dig Deeper: Export detailed reports in CSV or PDF format, including quiz results, assignment grades, and average completion rates.
3. Set Alerts: Turn on notifications for low performers or key milestones to stay on top of learner progress.
Want hands-on guidance? Learn how to build your online course in just 60 minutes.
5 Creator Tips You’ll Wish You Knew Sooner
When you create an online course, smart experience-backed tweaks separate good courses from great ones.
1. Chunk lessons at real decision points: End sections where learners naturally pause, after a key idea, or before an exercise. A short, complete concept always beats an abrupt, long one.
2. Front-load difficult content in weeks 2-3: Week 1 enthusiasm fades fast. Place your toughest material right when motivation dips, supported by guides or examples.
3. Design assessments that reveal blind spots: Ask applied, real-world questions that make learners think, not just recall. Branching scenarios work best.
4. Set up UTM tracking before launch: Know which traffic actually brings learners who finish. Tag every email, ad, and post from day one.
5. Write for the ear, not the eye: Read scripts aloud, use contractions, and keep them conversational. Natural speech keeps videos engaging.
Don’t Do These (Seriously) When You Create an Online Course
A few early decisions can derail your course faster than any tech glitch.
- Building before validating: Sell to a small beta group with a few modules ready. If no one bites, rethink before scaling.
- Chasing completion rates: Focus on learner outcomes instead, skills applied, promotions earned, or measurable progress.
- Ignoring early engagement drop-offs: Send a quick, actionable task right after signup to create momentum. Those first 48 hours decide retention.
Watch: How to Create a Course in Under 20 Minutes
Level-Up Tweaks for Your Course
Once your course runs, optimize for behavior, not vanity metrics.
1. Use “ghost cohorts” with timed unlocks: Add optional pacing and soft deadlines to boost completion without forcing live cohorts.
2. Record a week-three reality check video: Acknowledge the mid-course slump, normalize frustration, and motivate learners to push through.
3. Automate behavior-based messages: Trigger emails based on actual activity, such as missed logins, stalled modules, or quiz results.
4. Offer a “steal this” freebie: Release a useful framework or checklist publicly. If free value impresses, your course will sell itself.
5. End each module with an action prompt: Replace “What did you learn?” with “What will you apply in the next 24 hours?” to turn learning into a habit.
The Real Work Starts After You Hit Publish
Most people trying to create an online course obsess over launch day. But here’s what actually matters: what you do in week two when engagement drops, when three people email the same confused question, and when your “perfect” video gets skipped by 60% of learners.
Your first version will have gaps. That’s not failure, that’s data. The creators who win aren’t the ones with flawless launches. They’re the ones who watch where people struggle, ask why, and fix it fast.
So ship something now. Make it good enough to learn from. Then let your learners show you what it needs to become. The course that changes lives isn’t the one you imagined; it’s the one you iterate into existence.
Frequently Asked Questions

What does it cost to create a professional course?
Budget $0 - $500 if bootstrapping (platform fees, mic, recording tools). A mid-range setup costs $500 - $2,000 with better audio, lighting, and editing software. The biggest investment is time, expect 10 - 15 hours of work per finished hour of content.
How should I price my course?
Under $100 sells fast but attracts low commitment. Over $300 needs proof, testimonials or clear ROI. The sweet spot for beginners is $97 - $197: enough to signal value without scaring off first-time buyers. Test and adjust based on feedback.
What if learners buy but never start?
Send a “start now” email within two hours of purchase with one simple task, like watching a short video or replying with a question. Follow up 48 hours later if inactive. Treat non-starters as a separate audience, they need momentum, not more content.
Can I create a course without being an expert?
Yes. You just need to be a few steps ahead of your learners. Share real experiences, results, or examples instead of theory. Credibility comes from doing, not titles, teach what you’ve lived and keep it authentic.
Let ProProfs AI create your training course
 We'd love your feedback!
What did you like & how can we make it even better?
 Thanks for your feedback!
 Ask Your Question
Have a question? Get expert help to make your decision easier.