
I’ve built enough training modules to know the actual bottleneck isn’t the topic, or the recording, or even the platform. It’s the moment somewhere around week two when you realize you have to create an eLearning course that other people will actually finish, not just one that exists. Those are two very different projects wearing the same outline.
This is the version of that process I wish someone had handed me the first time: the sequence that actually holds up once real, distracted, half-interested learners get their hands on it. Ten steps, in order, with the parts everyone skips left in on purpose.
Put in the right efforts where it matters most and achieve your goal of course creation faster.
Steps to Creating a Successful eLearning Course
“The biggest benefit of eLearning is the utter lack of pressure. Because you get to set your own schedule and study only when you have time, eLearning makes learning not something you have to get over with, but something you look forward to.”
Step 1: Pick the Right Topic
Step 2: Check the Market Demand
Step 3: Set SMART Goals
Step 4: Structure Your Course Modules
Step 5: Choose the Delivery Method & Platform
Step 6: Take Care of Recording & Editing
Step 7: Set the Pricing
Step 8: Launch Your Course
Step 9: Gather Feedback
Step 10: Build an Online Community
Stop Wasting Hours on Course Creation! ⏳✨
Don’t want to take the long walkthrough of steps? Create an employee training session your team will love—in just 60 minutes.
Below is the in-depth process that you can follow to create practical e-learning courses.
Step 1: Pick the Right Topic
Pick something you can defend under questioning. Not passion, exactly. Depth.
The topic has to survive contact with an actual learner who’s tired, half-distracted, and looking for a reason to close the tab. If you can’t answer three follow-up questions on your subject without opening a reference doc, you’re not ready to teach it yet. That’s not a criticism, it’s just information.
Run a small survey. Talk to five people who’d take the course if it existed. Ask what they’re actually stuck on, not what they think they should learn. Those are rarely the same answer, and the gap between them is usually where your best content lives.
One thing I’d flag: passion helps you finish the project. It does nothing for the learner. Keep those two motivations separate in your head, because conflating them is how creators end up writing courses that are satisfying to make and useless to sit through. If you’re figuring out how to create your own eLearning course for the first time, this is the decision that quietly shapes everything after it.
Step 2: Check the Market Demand
Before you build anything, check whether anyone is actually looking for it.
Pull search volume on your topic and its close variants. Look at what’s already ranking, and read the comments, not just the content, because that’s where the unmet need usually surfaces. If three courses already cover your exact angle and none of them address the actual complaint people are leaving, you’ve found your opening.
If you’re still early in figuring out how to create eLearning content that fills a real gap instead of a hunch, this is the step that answers it. A few things worth checking:
- Search volume and trend direction, not just a single month’s snapshot
- Existing competitor courses, specifically their reviews
- Whether the demand is seasonal or steady (compliance topics behave very differently than skill-building ones)
Skipping this step is how people spend three months on eLearning course creation for a course nobody was searching for. I’ve watched it happen. It’s not a fun conversation to have with yourself in month four.
Step 3: Set SMART Goals
Here’s where most of the advice out there gets the sequence backward. Everyone wants to jump straight to the fun part: picking software, choosing a template, maybe even filming the intro video before the course has a spine.
Don’t. Design first, build second. In that order, every time.
What that actually means in practice: nail your learning objectives, then design how you’ll test for them, then storyboard the content, then produce your media, and only then start touching a platform. It looks like this laid out:
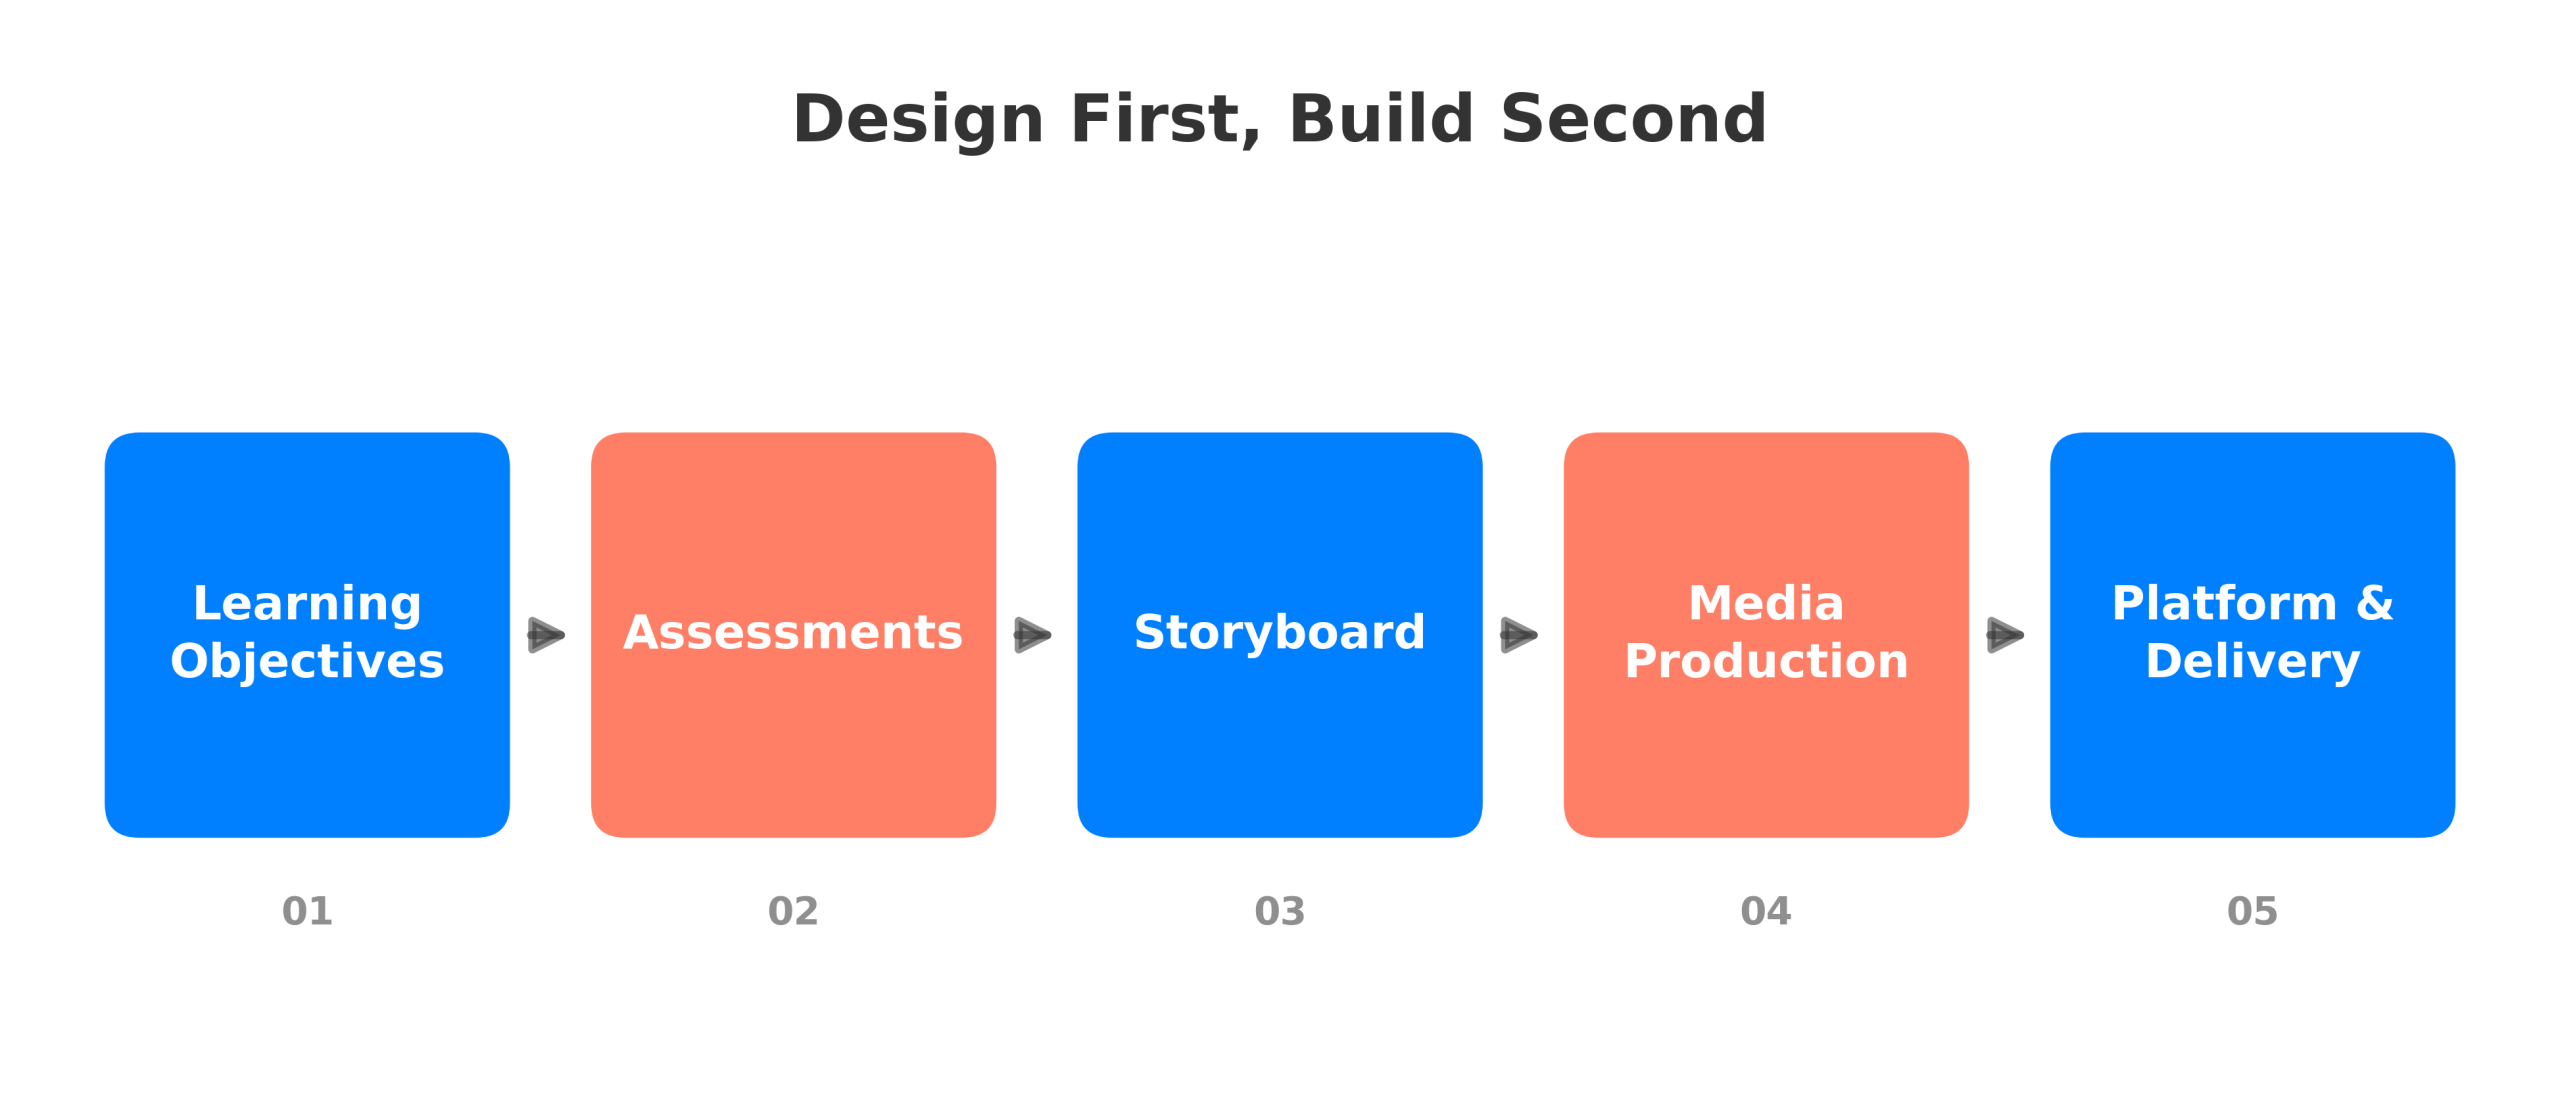
Notice assessments come before storyboarding, not after. Most creators write the content first and bolt on a quiz at the end because it feels like the natural order. It isn’t. If you don’t know how you’re going to verify someone learned something, you don’t actually know what you’re teaching them, you just have an opinion about it that sounds structured.
Use a SMART framework if it helps you stay honest: specific, measurable, achievable, relevant, time-bound. The framework itself isn’t the point. The discipline of writing objectives down before you write content is. Break the big goal into smaller milestones you can actually check off, because “make a great course” isn’t a goal, it’s a mood. This is also the point where most guides on how to create eLearning content quietly skip ahead to tools, and where I’d ask you to resist doing the same.
Step 4: Structure Your Course Modules
Once your objectives and assessments exist on paper, structuring becomes almost mechanical. Almost.
Divide content into modules that map to a single objective each. Not two. Not “sort of three.” One. Each module needs a clear intro, the content itself, something interactive, and a check for understanding before the learner moves on.
Use headers and bullet points inside each module so learners can scan before they commit to reading. Nobody opens a training module hoping for a wall of text, and if they do, they don’t stay for long.
Where this gets genuinely faster now: if you’re structuring inside ProProfs Training Maker, you can hand it a topic and a short description, and its AI course builder will draft a chapter outline, complete with quiz questions, that you then edit rather than build from scratch. It’s not a replacement for the design-first work above; it’s a way to skip the blank-page part of structuring once you already know what the modules need to cover.
One more thing worth doing here that almost nobody does: build a small template library for your common interaction types (a scenario branch, a matching activity, a knowledge check) the first time you need them. You will need them again. Rebuilding the same interaction from scratch every single time you create an eLearning course is a tax you’re choosing to pay.
Step 5: Choose the Delivery Method & Platform
This is the step where creators either save themselves months of pain or set a trap they’ll walk into later. I’ve done both, in that order, on two different projects.
The decision under the decision. Everyone frames this as “which LMS,” but that’s the surface question. The real one is whether you want to spend your time creating and marketing content, or maintaining infrastructure. Most people, if they’re honest, want the first one.
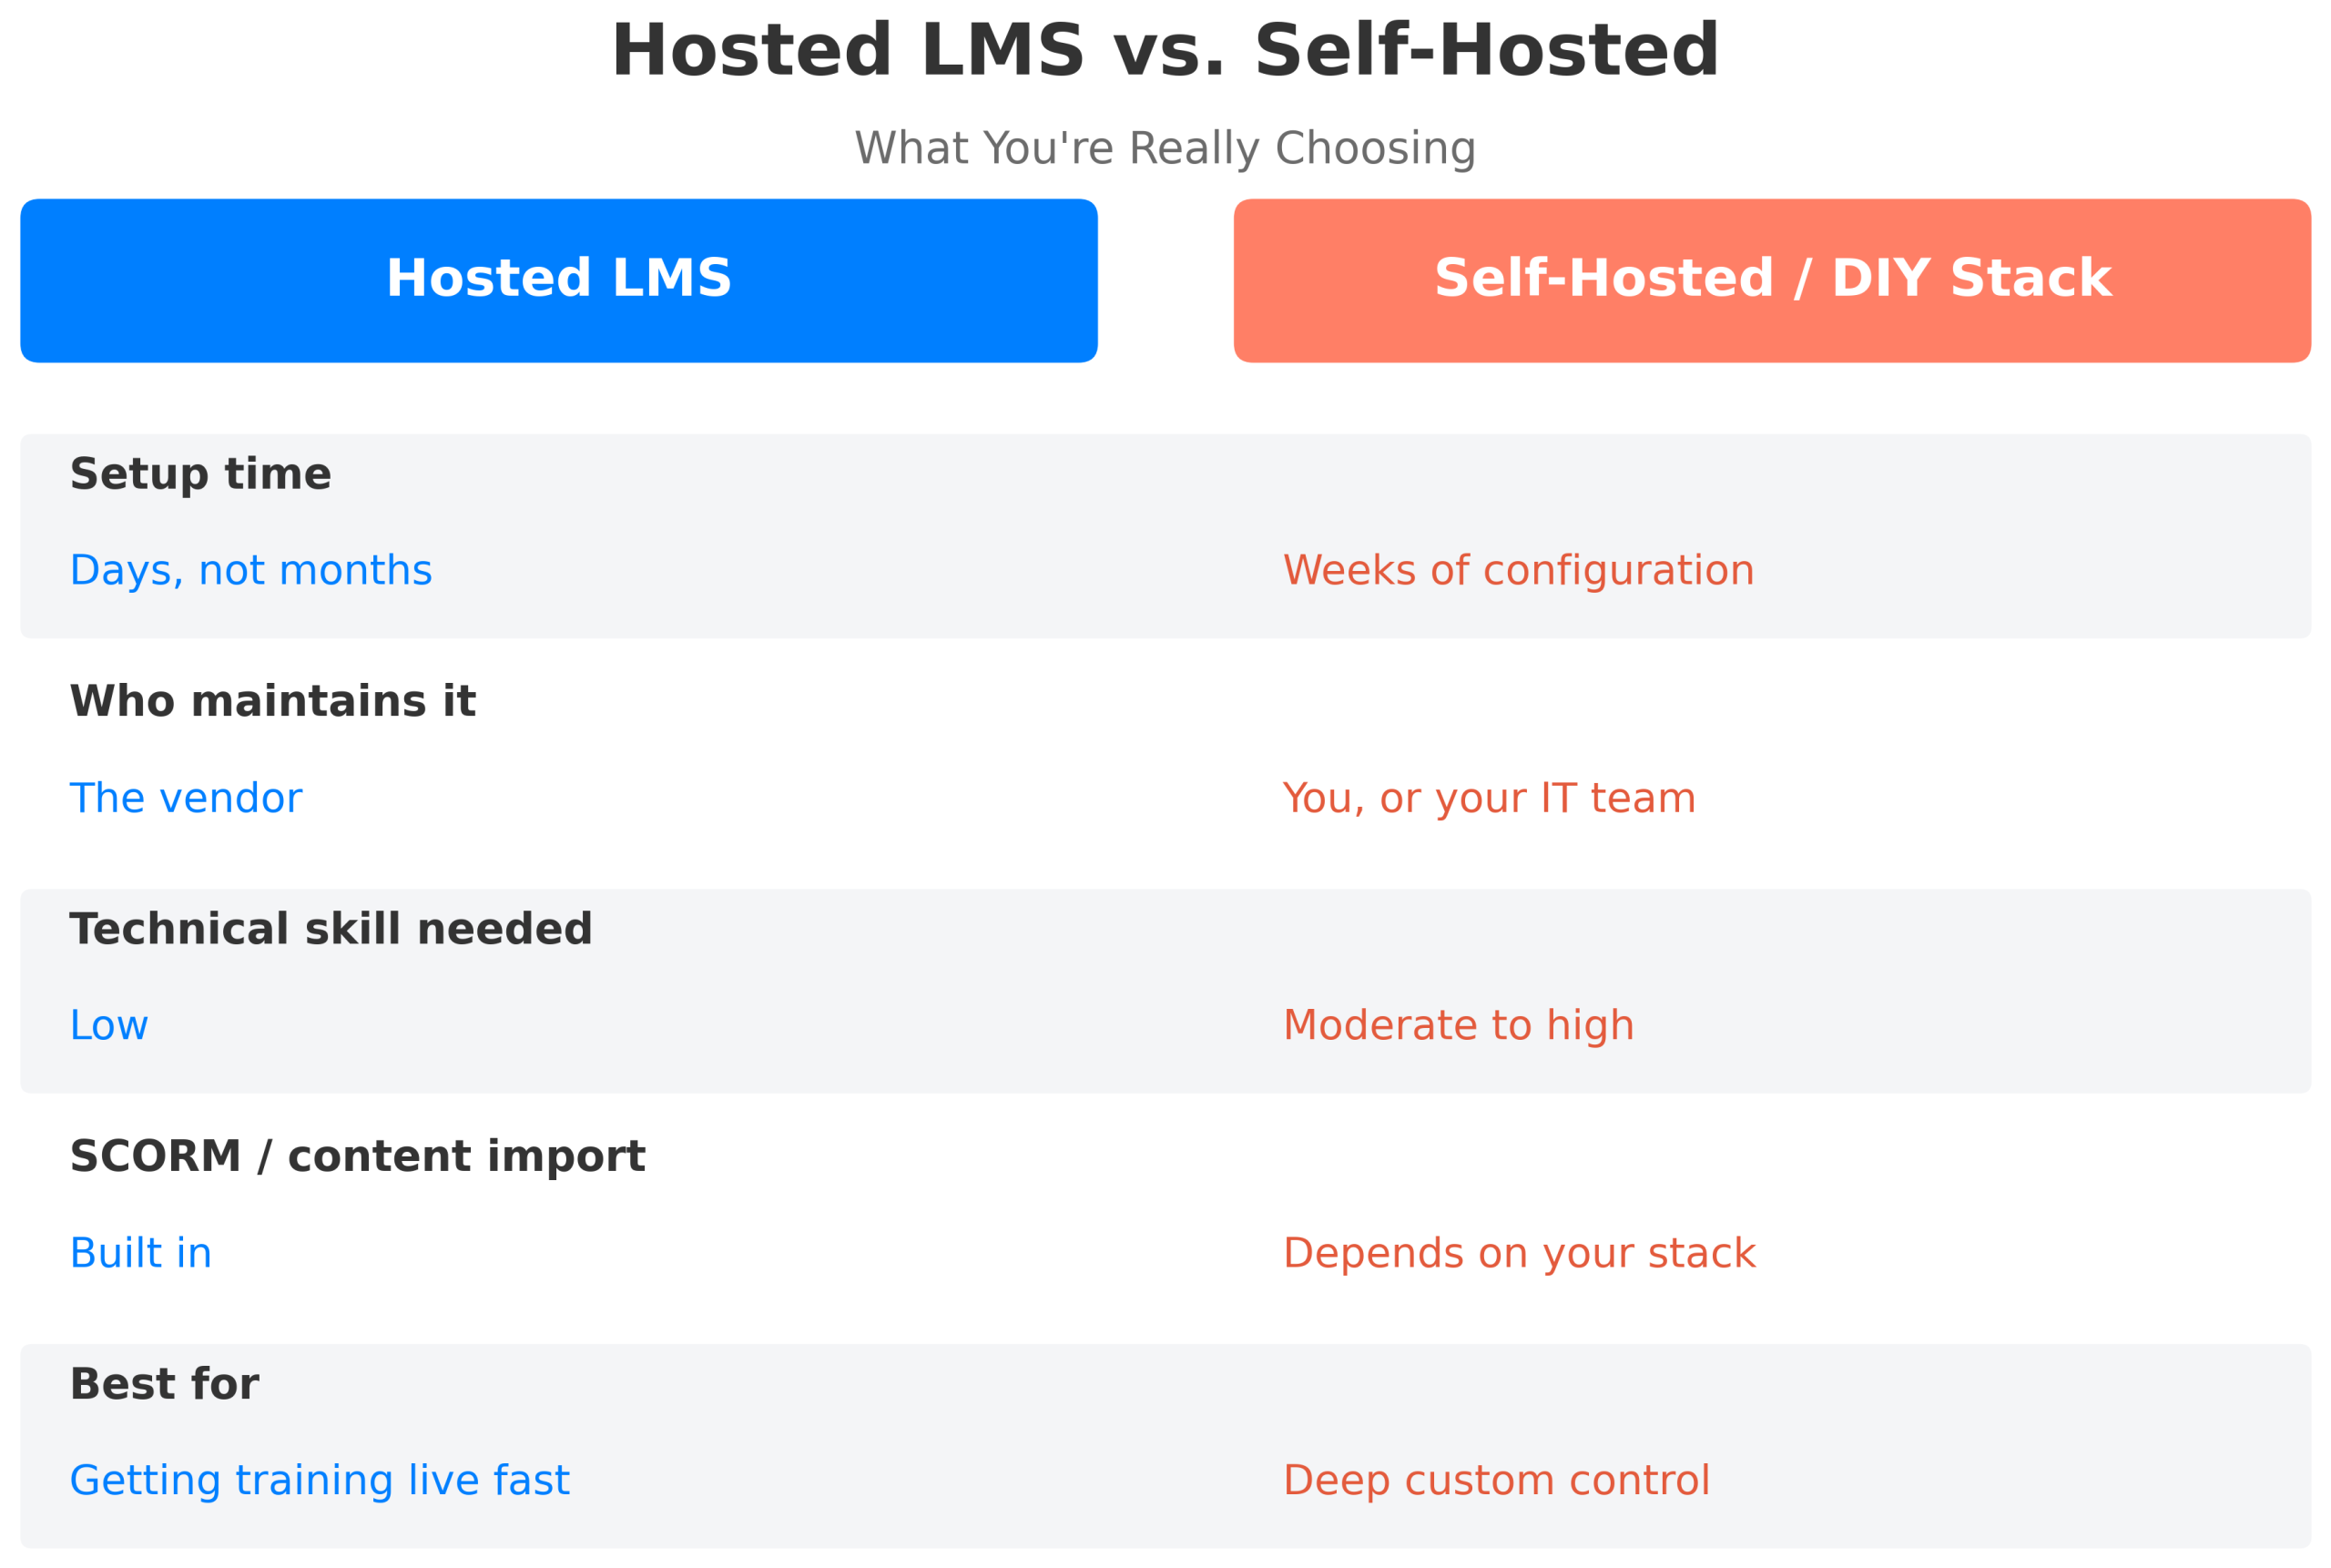
A hosted LMS gets out of the way. Someone else handles servers, updates, and security, and you focus on the eLearning course creation itself: the content, the assessments, the delivery to learners. Self-hosting gives you more control, and it demands a level of technical upkeep that a lot of solo creators and small teams underestimate until they’re three support tickets deep on a Friday.
The warning nobody gives you up front: check whether your platform supports SCORM before you build a single module. This matters more than it sounds like it should. If you ever need to move your content, whether that’s switching platforms, selling it through a different channel, or archiving it for compliance reasons, a platform without SCORM support means rebuilding from zero.
I’ve seen creators find this out after eighteen modules were already live. It’s an expensive way to learn a lesson that takes thirty seconds to check for in advance. ProProfs Training Maker is SCORM-compliant, so content built in standard SCORM authoring tools imports cleanly, and your completion and compliance data exports out when you need it for audits or HR systems.
A couple of other things to check before committing, since they’re easy to miss until they cost you money or credibility:
- Whether the platform locks video storage behind a cap, forcing you onto a separate host like Vimeo for anything in 4K
- Whether it can protect your content from casual piracy if you’re planning to sell it
- Whether registering and paying is a two-step process for the learner, or a six-step one (this one matters more than people expect; more on that under Step 8)
Whichever platform you land on, weigh ease of use, customization, payment handling, and marketing features against your actual technical comfort. Not your aspirational technical comfort. Your real one.
Watch: Choose a platform that aligns with your course requirements, budget, and technical abilities.
Step 6: Take Care of Recording & Editing
Nobody warns you about this ratio, so I will: writing the content is maybe 20 percent of the work. The other 80 percent is production, formatting, building interactions, setting up navigation, and testing the thing actually works the way you designed it.
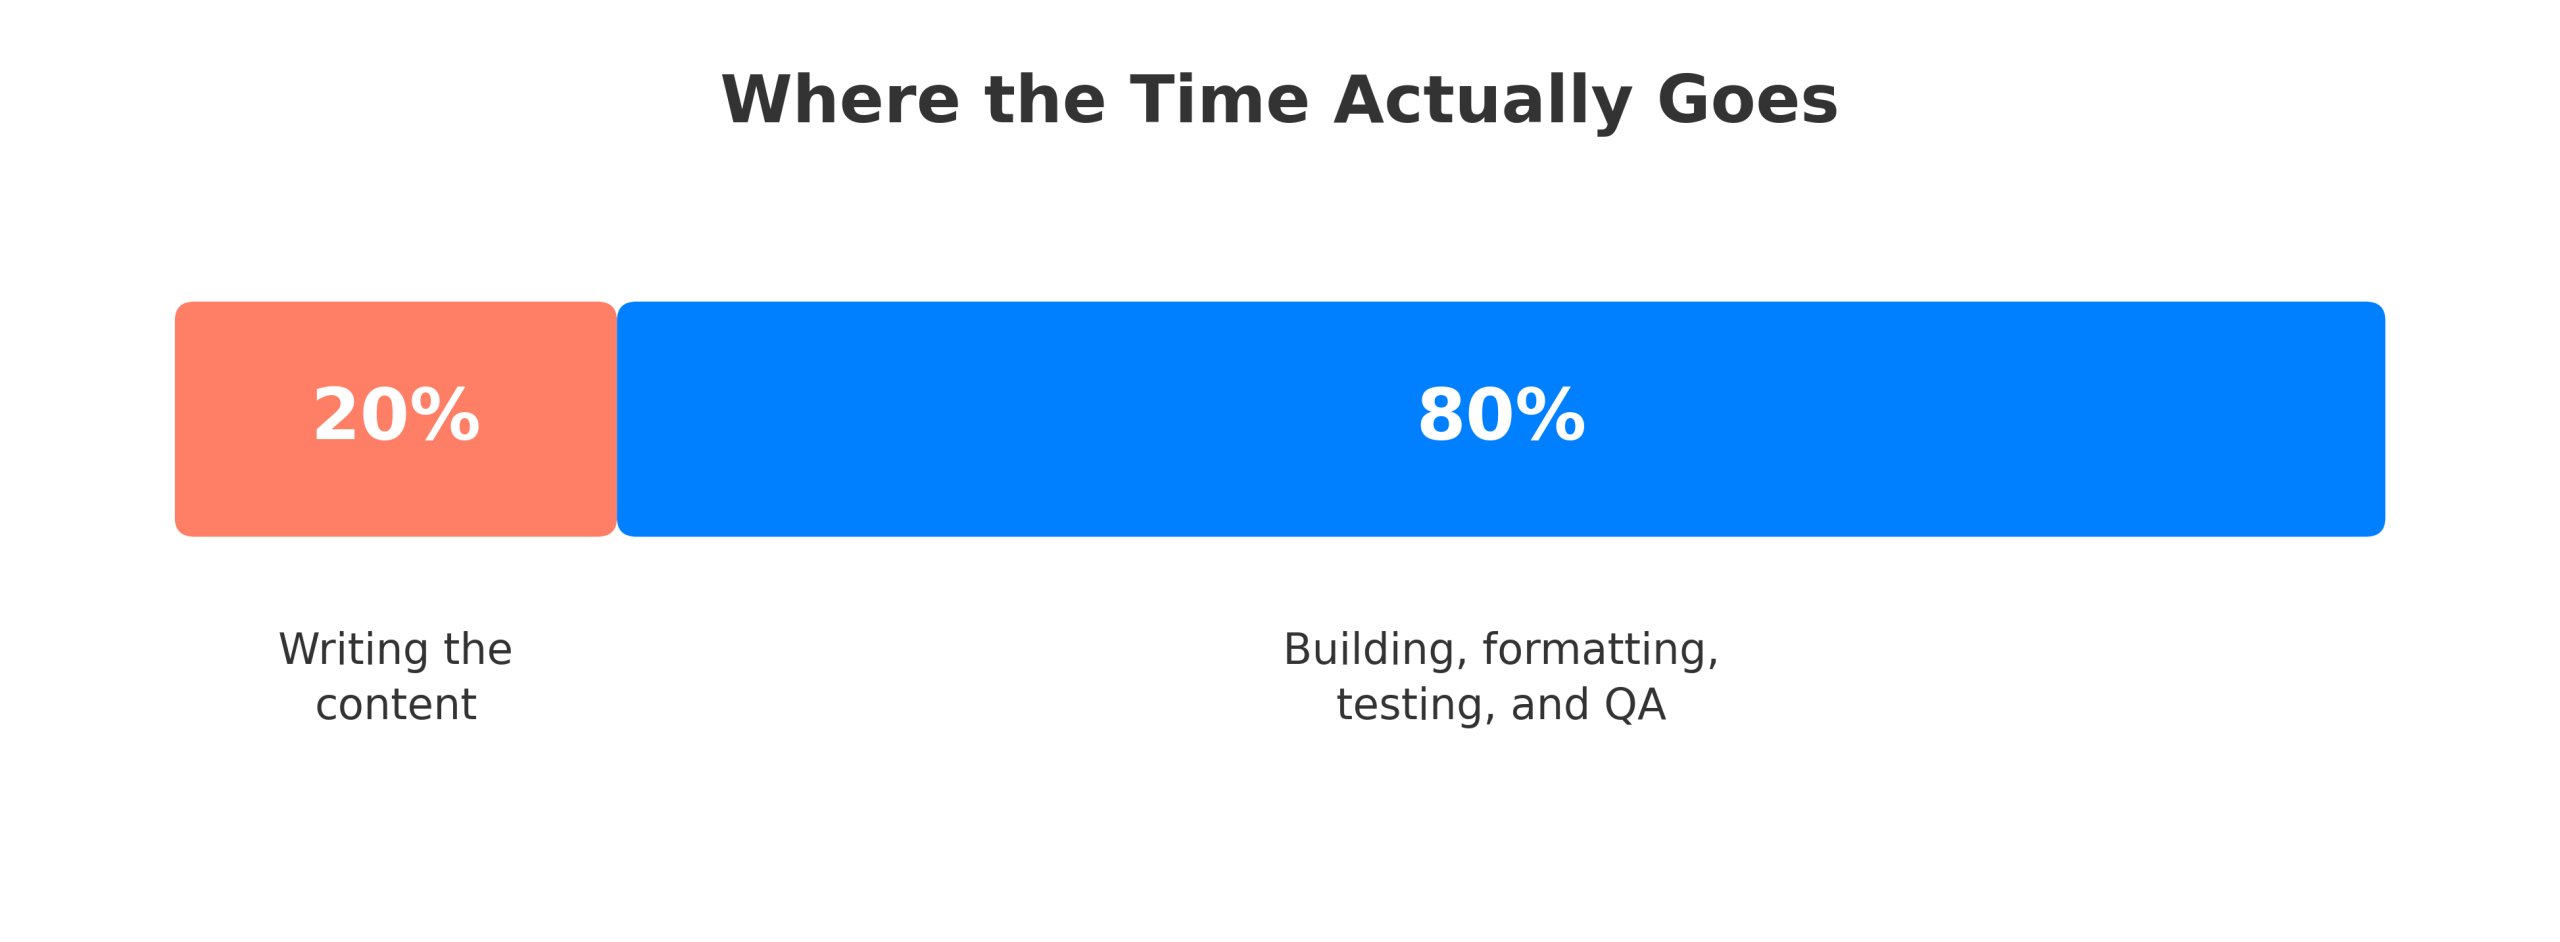
That’s not a discouraging statistic. It’s a planning one. If you budget your time as though the writing is the hard part, you will blow your timeline in the production phase, every time, without exception. Most explanations of how to create eLearning content skip straight past this ratio, and it’s the single most common reason launch dates slip.
Invest in decent audio before you worry about video quality. Learners forgive a mediocre webcam. They do not forgive audio they have to strain to understand. Script your content in advance so you’re not improvising structure on camera, and edit out the dead air and false starts, because production value is one of the few things that separates “professional-feeling” from “someone recorded this in their kitchen.”
Where the QA loop actually matters: if you’re building anything high-stakes, compliance training, certification prep, onboarding that touches legal exposure, the accuracy review is the bottleneck, and no amount of AI-assisted drafting speeds it up. Someone has to check every diagram, every formula, every step, because a single error in a compliance module doesn’t just look bad; it can mean certifying someone on incorrect information. Budget real time for this pass. Don’t compress it to hit a launch date.
Step 7: Set the Pricing
Pricing is where good courses quietly underperform, not because the content is weak, but because the number attached to it was decided emotionally instead of strategically.
Whatever platform you chose in Step 5 already shapes your pricing math, whether you’ve noticed it yet or not. A flat monthly subscription is predictable, but it bills you even in a month where zero students enroll. A revenue-share or pay-per-sale model feels safer at low volume, since you’re not paying for nothing, but it takes a cut of every sale once you do have traction, and that cut compounds as you scale. Neither is wrong. They’re just different bets on how confident you are in your launch.
Run the actual numbers before you pick a model. Not a hopeful estimate, the real math on your first likely cohort size. And read the fine print on storage: some “affordable” plans cap video hosting hard enough that a handful of 4K modules push you into overage fees you didn’t budget for.
From there, the pricing question gets more normal:
- What does comparable content charge, and does yours over- or under-deliver relative to that
- Will you offer tiered pricing or bundles
- Does a free trial or money-back guarantee increase signups enough to offset the refunds it costs you
There’s no universal right answer here. Your market, your credibility, and your production quality all shift the number. What’s not optional is doing the math before you commit to a model, instead of after you’re locked into one for a year.
Step 8: Launch Your Course
A launch plan matters less than most people think. A frictionless checkout matters more than almost anyone accounts for.
Every extra step between “I want this” and “I’ve paid for this” costs you a percentage of your interested learners. If someone has to create an account, verify an email, and then separately pay, you’ve built three exits into a process that should have one entrance. Test your own signup flow as a stranger would experience it, not as someone who already knows where every button is.
Beyond that, the basics still apply: build a sales page that says specifically what the learner walks away able to do, not a vague list of “benefits.” Use testimonials if you have them. Announce the launch somewhere your audience already spends time, rather than hoping they find it organically. And once someone’s paid, tell them exactly how to access the course immediately. Confusion at the moment of purchase is the fastest way to generate a refund request.
Step 9: Gather Feedback
Collect it early, and collect it in a way that doesn’t just flatter you.
Surveys, quiz performance data, and drop-off points inside the modules will tell you more than a five-star rating ever will. If forty percent of learners stall on module four, that’s not a coincidence; that’s a design problem you now have the chance to fix before it costs you more enrollments.
Make it genuinely easy for people to tell you something isn’t working. Most won’t volunteer criticism unless you ask directly, and the ones who do are usually your most engaged learners, not your angriest ones. When you create your own eLearning course and it’s the only one you’ve built, this feedback loop is also the fastest way to learn what you got wrong without having to guess.
Step 10: Build an Online Community
This is the step people treat as optional and shouldn’t.
A discussion forum, a private group, or even a scheduled live Q&A gives learners a reason to stay engaged past the point where they’d otherwise quietly stop logging in. It also gives you, the creator, a direct line to what’s confusing people in real time, which is faster and more honest than waiting for a review.
Define what the community is actually for before you launch it. “Ask questions” is fine. “Ask questions, share wins, and get first access to new modules” is better because it gives people more than one reason to show up twice. This part of eLearning course creation rarely shows up in the planning phase, and it’s usually the reason a course with mediocre content outperforms one with excellent content but no community around it.
Community-building is slow. It rewards consistency, not launch-week enthusiasm. Show up, answer things promptly, and don’t abandon it after the first quiet week, because the first quiet week is normal, not a signal to quit.
Case Study: How Health First created & shared online training courses in an organized way.
Watch: How to Create a Course in Under 20 Minutes
The Part That Actually Determines Whether This Works
None of the ten steps above matter much if you skip the sequencing. That’s the honest answer to how to create eLearning content that holds up, more than any individual tip.
Every expensive mistake I’ve watched creators make traces back to doing something in the wrong order: building before defining objectives, picking a platform before checking SCORM support, pricing before understanding the platform’s cut, and launching before testing the checkout. The individual steps are not hard. The order is where projects quietly fail.
If you only take one thing from this: write your objectives and your assessments down before you open any authoring tool. Everything downstream gets easier once that exists, and almost nothing downstream fixes itself if it doesn’t. Whether you’re doing this to train a team of ten or to create your own eLearning course to sell, the sequence doesn’t change. Only the stakes do.
Frequently Asked Questions
Why should I create an eLearning course instead of running in-person training?
Scale and consistency, mainly. One well-built course reaches unlimited learners at the same quality, while in-person training varies by whoever's delivering it that day. It also lets people learn at their own pace, which most working adults need more than they admit.
How do I structure an eLearning course so people actually finish it?
Map each module to a single learning objective, keep modules short, and put a check for understanding at the end of each one. Momentum matters more than completeness. A learner who finishes six short modules retains more than one who abandons a single long one.
What is the first real step in eLearning course creation?
Writing your learning objectives and how you'll assess them, before you touch a platform or a script. Everything else, topic depth, structure, tools, exists to serve those objectives, not the other way around.
How do I choose the right platform when I create my own eLearning course?
Check SCORM support first, since that protects you from rebuilding later. After that, weigh ease of use, technical maintenance you're willing to take on, and whether registration and payment are genuinely low-friction for the learner.
Is it expensive to create an eLearning course?
It can be nearly free or genuinely costly, depending on production quality and platform fees. The bigger risk isn't the sticker price, it's hidden costs like video storage caps or a revenue-share model you didn't run the math on before launch.
Do I need to update my eLearning course after it's live?
Yes. Content ages, regulations shift, and learner feedback will surface gaps you couldn't see while building. Treat the first launch as a working version, not a finished one, and revisit it on a set schedule rather than only when something breaks.
What's the biggest mistake people make in eLearning course creation?
Choosing the platform before defining what the course needs to teach and test. It reverses the entire design process and usually means rebuilding modules later to fit assessments that should have existed from day one.
How do I create eLearning content quickly without cutting corners?
Use an AI-assisted course builder to draft your outline and quiz questions, then spend your saved time on the accuracy review, not on skipping it. Speed should come from the drafting stage, never from the QA stage.

Let ProProfs AI create your training course

 We'd love your feedback!
What did you like & how can we make it even better?
 Thanks for your feedback!
 Ask Your Question
Have a question? Get expert help to make your decision easier.